Implementing Outbox Pattern with Apache Kafka and Spring Modulith
In this blog, we look at the problem of “dual-write” which is common in Event driven systems and how Spring Modulith can be used to implement the Outbox pattern in an easy way to solve the problem. We will also explain how Axual provides an out-of-the-box secure, production-ready Kafka cluster with built-in Governance to ensure that your organization’s journey into Event Driven architecture is safe and scalable.

On this page
Implementing the Outbox Pattern becomes essential when building complex systems involving multiple components. It addresses the dual-write problem, where you need to update a database and another system, such as a microservice or event store, consistently.
When building any non-trivial system where multiple components are involved, sooner or later you will come across a solution design that requires updating two systems in a consistent manner. Typically one system is a database while the other system can be another service in a Microservice architecture or an event store in an Event Driven Architecture. This is sometimes referred to as the dual-write problem.
When the systems involved are a database and an event store, a popular solution is to apply the Outbox pattern. Before we look at the pattern, let’s understand why we need it with an example.
Consider that when a command is received to create an Order, the state of the order needs to be persisted in the database and a domain event ORDER_CREATED needs to be published to an Apache Kafka topic. Let’s look at possible options.
Dual Write Approach 1: Publish event to Kafka and save data in DB
Here’s the approach as pseudocode:
sendEventToKafka();
startTransaction();
saveOrderInDB();
commitTransaction();
The event is published to Kafka followed by persisting the Order in the database. But what if after the event is published, the local transaction to the database fails? The published event cannot be rolled back leading to an inconsistent system.
Dual Write Approach 2: Save data in DB and publish event to Kafka
What happens if the order of execution is reversed?
startTransaction();
saveOrderInDB();
sendEventToKafka();
commitTransaction();
At first glance, this seems to solve the consistency problem. But it suffers from other problems that are not immediately obvious. The creation of the Order is now dependent on availability of Kafka. While the Order service itself is available, the request cannot be fulfilled if Kafka is down.
A more subtle problem shows up on high loads. If Kafka is unavailable, the transaction will be rolled back and the database won’t be updated but the transaction (and the database connection) will remain open until the event is published to Kafka. With enough load, the database connection pool can get exhausted. In general, DB transactions should not execute IO or network related operations.
What if the event is published to Kafka asynchronously?
[thread 1] startTransaction();
[thread 1] saveOrderInDB();
[thread 1] commitTransaction();
[thread 2] sendEventToKafka();
This approach avoids the dependency of the request on Kafka but still suffers from inconsistency. Since the event is published to Kafka asynchronously after database transaction is committed, there is no possibility of rollback if event publishing fails.
It seems we have to deal with either an inconsistent system or risk system unavailability.
What is the Outbox Pattern?
In the Outbox pattern, instead of publishing the event to Kafka, a record is added into a special database table (known as “outbox”) capturing the intent of publishing an event. As this is the same database where the original persistence is happening, the same transaction can be reused and it is no longer a dual write problem and can be easily executed in the same transaction. Here’s the pseudocode:
startTransaction();
saveOrderInDB();
saveIntentInOutboxTable();
commitTransaction();
Then a separate asynchronous process monitors the outbox table and publishes the event. This solves the problems mentioned in the dual write approaches above.
The system is guaranteed to be eventually consistent as the background process will publish the event. The creation of the Order is no longer dependent on the availability of Kafka. Finally, the DB transaction does not involve any expensive IO or network operations preventing adverse impact on high load.
Of course, there is a downside. The background process is guaranteed to publish the event at least once. Duplicates are possible! This forces all services looking to consume the event to be idempotent. In Event Driven architectures, it is advisable to always have idempotent consuming services to properly handle error scenarios.
Naturally, the outbox pattern is adding complexity to the system. Implementing the pattern manually would be a massive undertaking in terms of development and testing. A popular way of implementing the Outbox pattern is with Debezium and Change Data Capture.
In this blog, we will look at a new way of implementing Outbox pattern with Spring Modulith library. It doesn’t require complex infrastructure setups and is an ideal solution for Spring projects.
Implementing Outbox Pattern with Spring Modulith
Spring Modulith is a recent addition to the vast ecosystem of Spring libraries. It provides tools to build modular monolith applications that are easy to maintain and evolve.
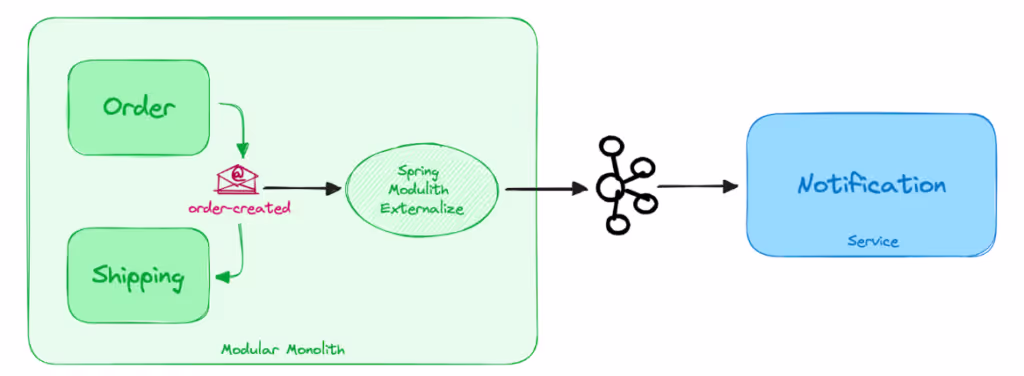
Let’s take a look at Outbox pattern implementation with an example. We have two services: Order and Notification. When an Order is created, the order details are persisted in the database. An event ORDER_CREATED is also published to Kafka. The Notification service consumes this event and triggers a notification.
The Order service is a modular monolith application consisting of two modules – Order and Shipping. When the ORDER_CREATED event is published, the Shipping module also consumes it and starts the shipping process. But since Order and Shipping are modules within the same application, it doesn’t consume the event from Kafka but instead uses ApplicationEventPublisher – Spring’s internal event publication functionality.
Setting up the Kafka cluster
Before diving into the code, let’s set up the Kafka infrastructure. To demonstrate how easy it is to obtain a secure, production-ready Kafka cluster, we will use a cluster powered by Axual. Here is a summary of the steps:
- Start an Axual trial to obtain a secured Kafka cluster.
- Create a Kafka topic.
- Register the Order and Notification services as “Application”.
- Obtain Kafka credentials for our services.
- Authorize the services to produce and consume from the Kafka topic.
Ready for Implementing Outbox Pattern?
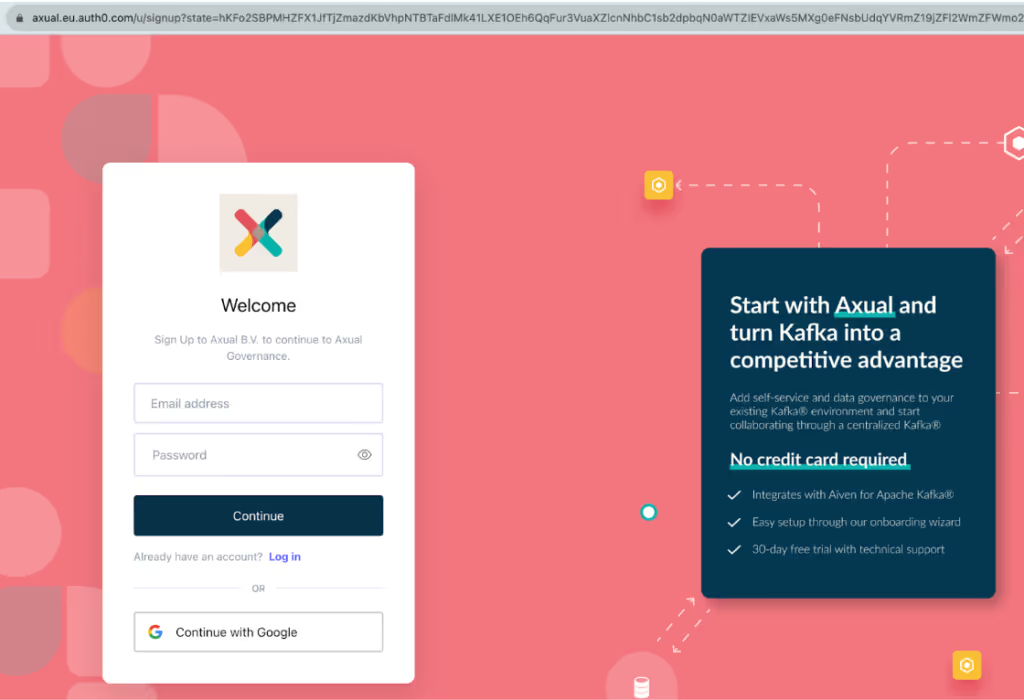
Let’s start the trial at https://axual.com/trial
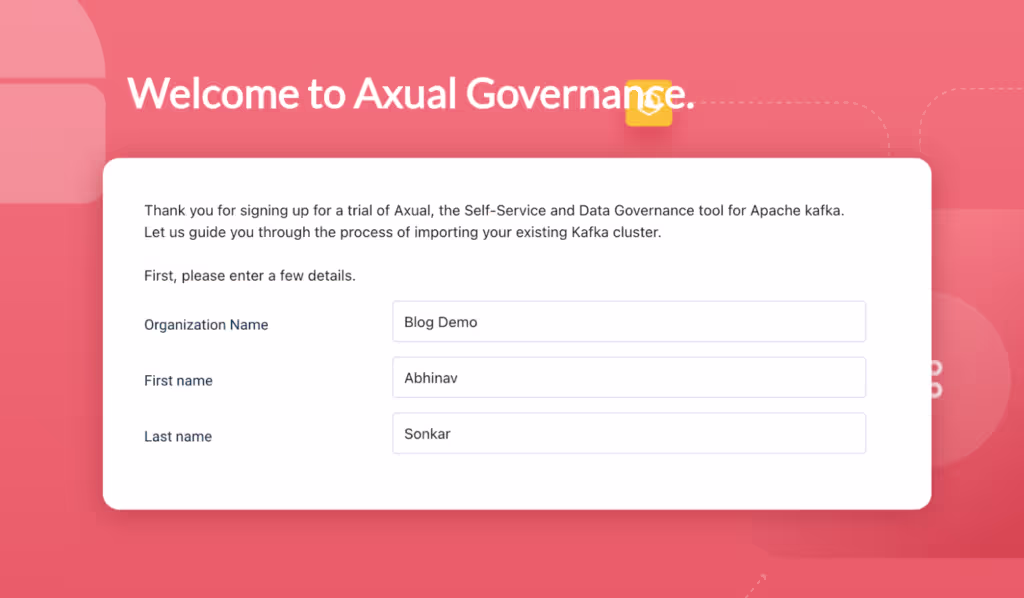
After signing up, we must choose the name of the Organization and the first and last name.
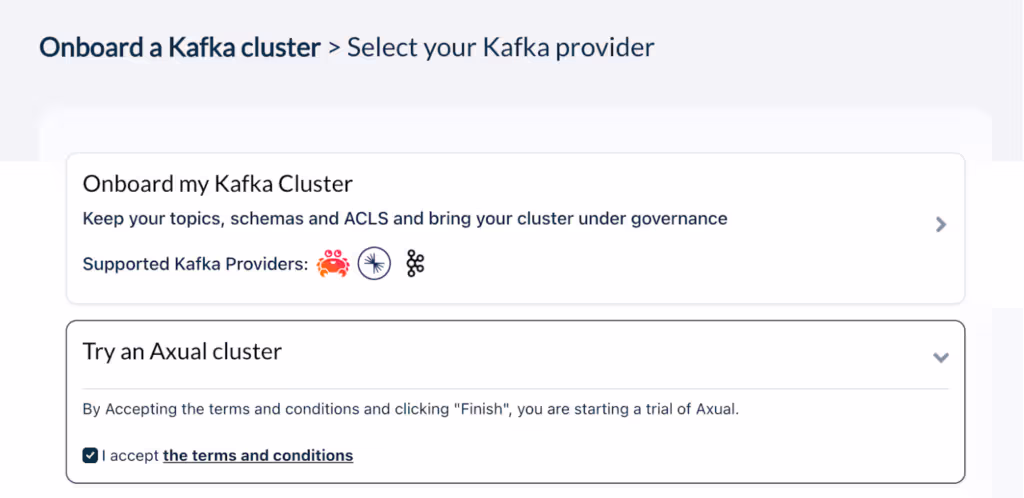
Next, we need to choose a Kafka cluster. We have the option of adding our own Aiven or Confluent Cloud cluster or opt for a cluster from Axual. Since we are in need of a cluster, let’s go with the Axual cluster option.
That’s it! We have a Kafka cluster available.
Now, let’s define the Kafka topic. We only need one topic “order-created” which will store the ORDER_CREATED events. Click on the Topic button on the left, then the “New Topic” button on the right and fill in the details. You can also follow the Guided Tour to create the first topic.
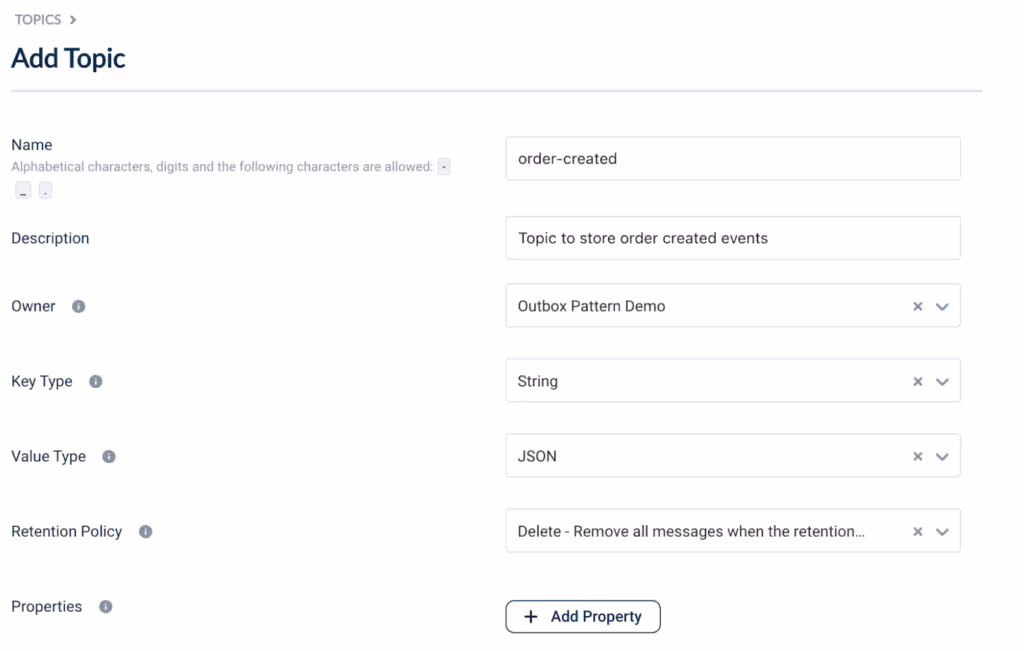
We have defined the metadata of the topic. The most important metadata is the owner of the topic. When governing an event streaming platform and its topics across the organization, it is important to have clearly defined ownership that aligns with the data contained in the topic.
Next, we need to configure the topic to deploy it in Kafka.
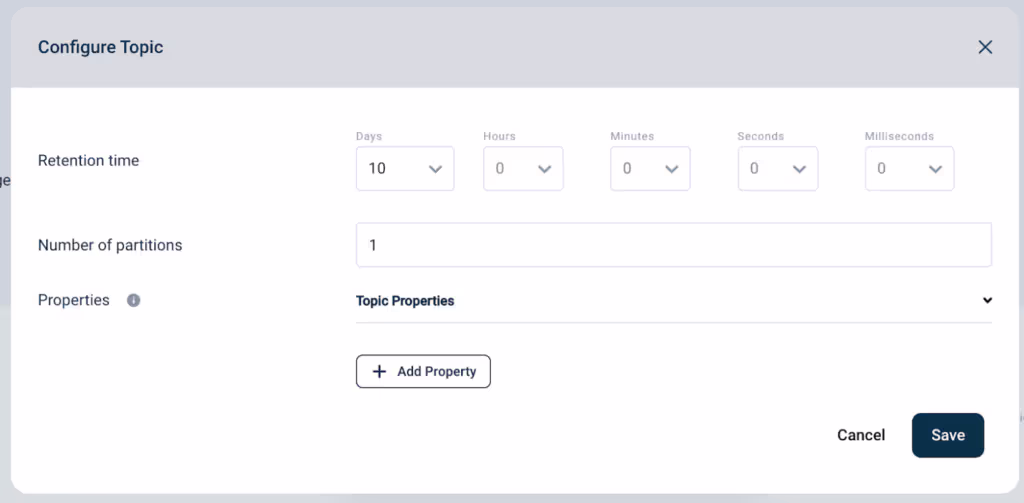
Congratulations, we have successfully created our first topic in Kafka.
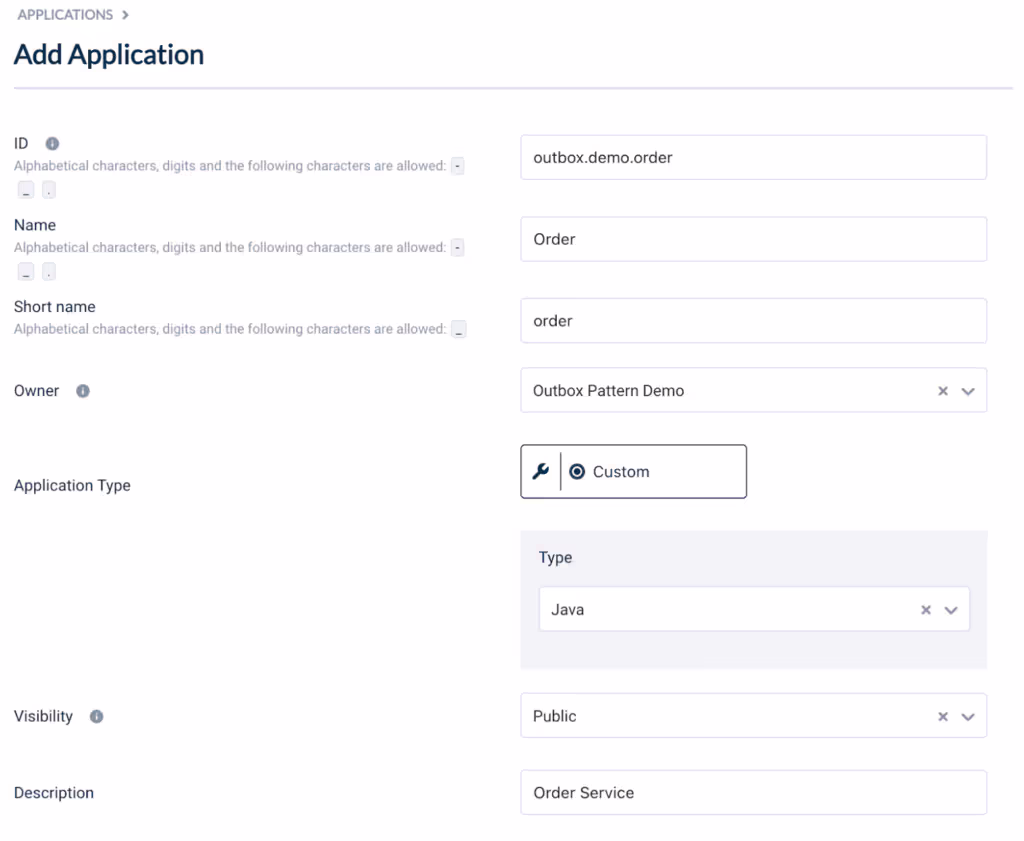
Next we will register our services as Applications and obtain the necessary permissions on the topic and credentials to produce and consume. We will register two applications – Order and Notification. The Order application will produce events to the topic “order-created” while the Notification application will consume events from the same topic.
Click on the Applications button on the left menu, then the “New Application” button on the right and fill in the details. Repeat the steps to create Order and Notification applications.
Topics created in Axual Kafka cluster are secured by default. Applications that need to produce or consume must obtain relevant credentials and authorizations. That will be our next step.
Once both applications are created, we need to generate the credentials to authenticate with Kafka. Select the Order application, click on the lock icon and finally click on “+ Generate new pair” to generate SASL credentials. Copy the username and password and store it somewhere safe. We will need it later.
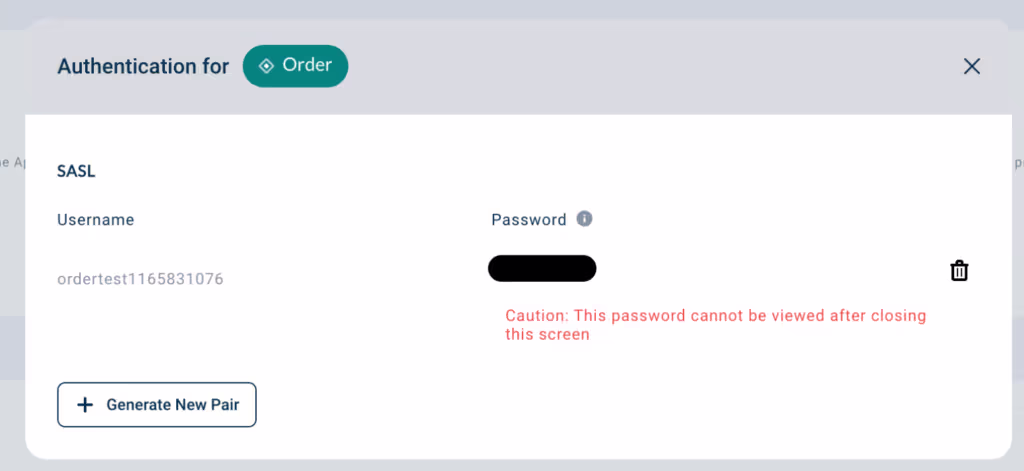
Repeat the steps to generate SASL credentials for Notification application.
Finally, we need to request for authorization to the “order-created” topic. On the application page of Order service, scroll down and click on “+ Add request”. Select “Producer” as application type and choose the topic from the dropdown. Click on “Request Approval”.
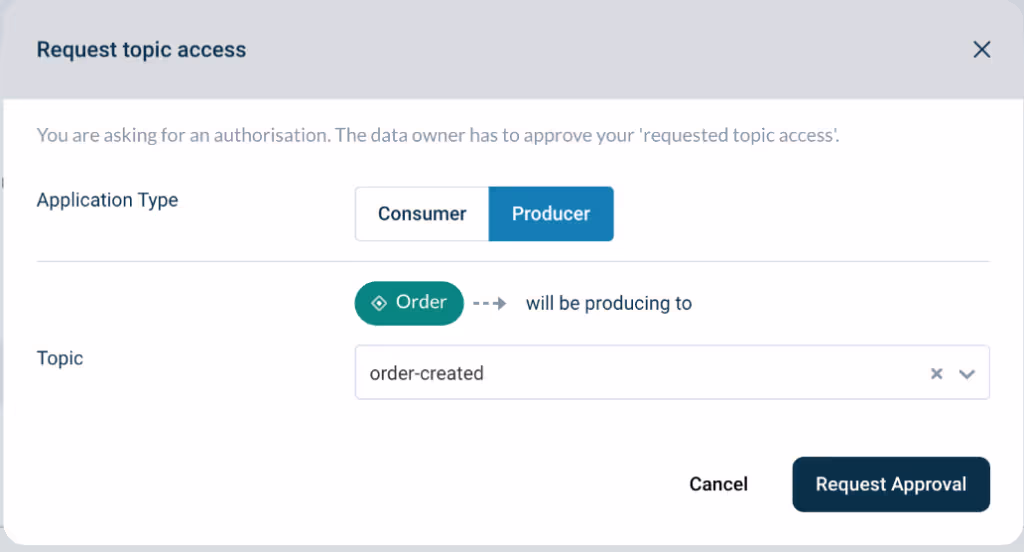
We have requested “produce” access to the topic “order-created” for our application. The request must be approved by the owners of the topic. Click on the topic name to visit the topic page, scroll down to see the pending access request. Click on “Approve request”. This authorizes our application and creates the necessary ACLs in Kafka.

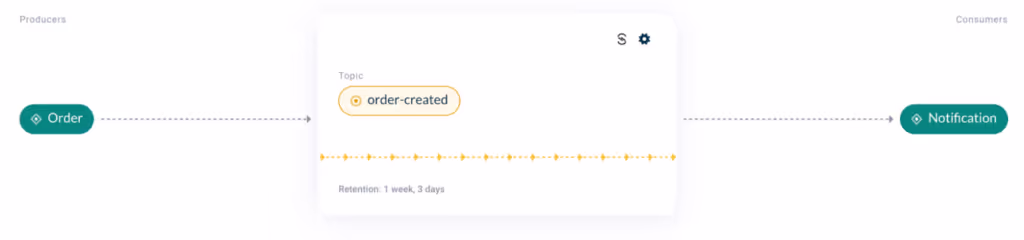
Repeat the steps for Notification service and obtain “consume” access. Once completed, you should see the following visual on the “order-created” topic page. We have successfully configured the Kafka infrastructure for our Outbox pattern implementation!
Implementing the Order Monolith
Let’s write some code! The fully working code is available at https://gitlab.com/axual/public/outbox-pattern-with-spring-modulith.
We will use Spring Boot to build the Order service. First let’s have a look at the packaging structure of our Order monolith.
src/main/java
└── example
    ├── order
    │   ├── internal
    │   │   ├── Order
    │   │   ├── OrderController
    │   │   ├── OrderManagement
    │   │   └── OrderRepository
    │   └── OrderCreated
    └── shipping
        └── Shipping
The following dependencies are required to add Spring Modulith library. The complete pom.xml can be found here: https://gitlab.com/axual/public/outbox-pattern-with-spring-modulith/order/pom.xml.
<dependencyManagement>
  <dependencies>
    <dependency>
      <groupId>org.springframework.modulith</groupId>
      <artifactId>spring-modulith-bom</artifactId>
      <version>1.2.0-SNAPSHOT</version>
      <type>pom</type>
      <scope>import</scope>
    </dependency>
  </dependencies>
</dependencyManagement>

<dependency>
    <groupId>org.springframework.modulith</groupId>
    <artifactId>spring-modulith-starter-core</artifactId>
</dependency>

<dependency>
    <groupId>org.springframework.modulith</groupId>
    <artifactId>spring-modulith-starter-jpa</artifactId>
</dependency>
The spring-module-starter-jpa dependency enables an Event Publication registry. This registry is powered by the underlying persistence technology (in this case H2). It creates a table EVENT_PUBLICATION with following schema for H2:
CREATE TABLE IF NOT EXISTS EVENT_PUBLICATION
(
  ID               UUID NOT NULL,
  COMPLETION_DATE  TIMESTAMP(9) WITH TIME ZONE,
  EVENT_TYPE       VARCHAR(512) NOT NULL,
  LISTENER_ID      VARCHAR(512) NOT NULL,
  PUBLICATION_DATE TIMESTAMP(9) WITH TIME ZONE NOT NULL,
  SERIALIZED_EVENT VARCHAR(4000) NOT NULL,
  PRIMARY KEY (ID)
)
Schemas for other supported databases can be found here: https://docs.spring.io/spring-modulith/reference/appendix.html#schemas
When an event is published by the Spring ApplicationEventPublisher, the registry locates all transactional event listeners expected to receive the event and writes an entry in the table above. By default, the entry is considered incomplete (COMPLETION_DATE column is NULL). When the transactional event listener completes successfully, the entry is marked completed.
The two modules Order and Shipping are represented as top-level packages. To persist an Order in the database, we need the Order entity.
@Entity
@Getter
@NoArgsConstructor
@Table(name = "orders")
public class Order {

    @Id
    @GeneratedValue(strategy = GenerationType.IDENTITY)
    private Long id;

    private String product;

    @Enumerated(EnumType.STRING)
    private OrderStatus status;

    public Order(String product) {
        this.product = product;
        this.status = OrderStatus.CREATED;
    }

    public enum OrderStatus {
        CREATED, COMPLETED
    }
}
The event generated when an Order is created is represented with a Java Record.
public record OrderCreated(Long id, String product) {
}
The OrderManagement class is responsible for creating an Order and publishing the OrderCreated event.
@Slf4j
@Service
@Transactional
@RequiredArgsConstructor
public class OrderManagement {

    private final OrderRepository orders;
    private final ApplicationEventPublisher events;

    public Order create(String product) {

        var order = orders.save(new Order(product));

        events.publishEvent(new OrderCreated(order.getId(), order.getProduct()));

        log.info("Order created");

        return order;
    }
}
We use Spring’s built-in ApplicationEventPublisher to publish the OrderCreated event. Note that this does not publish the event to Kafka. The event remains within the JVM and is handed over to any EventListeners within the same JVM.
The event is consumed by the Shipping module. Here’s the Shipping event listener.
@Slf4j
@Service
@Transactional
@RequiredArgsConstructor
public class Shipping {

    @ApplicationModuleListener
    void on(OrderCreated event) {
        ship(event.id());
    }

    private void ship(Long orderId) {
        log.info("Started shipping for order {}", orderId);
    }
}
Note the annotation @ApplicationModuleListener. It comes from Spring Modulith library and is a shortcut for @Async and @TransactionalEventListener. From the Javadoc, “The setup makes sure that an original business transaction completes successfully and the integration asynchronously runs in a transaction itself to decouple the integration as much as possible from the original unit of work”.
This event driven approach ensures that the two modules Order and Shipping are loosely coupled. If the Shipping module was unavailable (technically not likely as they run as a monolith), the Order module would be fully functional.
Publishing Events to Kafka
At this point, the modules in our monolith are working nicely and communicating via events. But we also need to publish the event to Kafka to ensure the Notification service is able to consume it and trigger notifications.
With Spring Modulith, this is trivial to implement. We need to externalize the event to an event broker of our choice – in this case Kafka. Let’s add the required dependency in our pom.xml.
<dependency>
    <groupId>org.springframework.modulith</groupId>
    <artifactId>spring-modulith-events-kafka</artifactId>
</dependency>
This dependency automatically pulls in the Spring Kafka library. It will look for Events annotated with @Externalized and automatically publish the event to a Kafka topic.
@Externalized("order-created::#{id()}")
public record OrderCreated(Long id, String product) {
}
The annotation accepts a topic name and a message key identifier. Here the topic name is order-created and the id() function in the OrderCreated record is the strategy to obtain the key.
To produce a message to Axual provided Kafka cluster, we need to set the Kafka producer configuration including bootstrap and SASL credentials. The connectivity details can be found on the application page in Axual UI. Click on the ‘i’ icon.
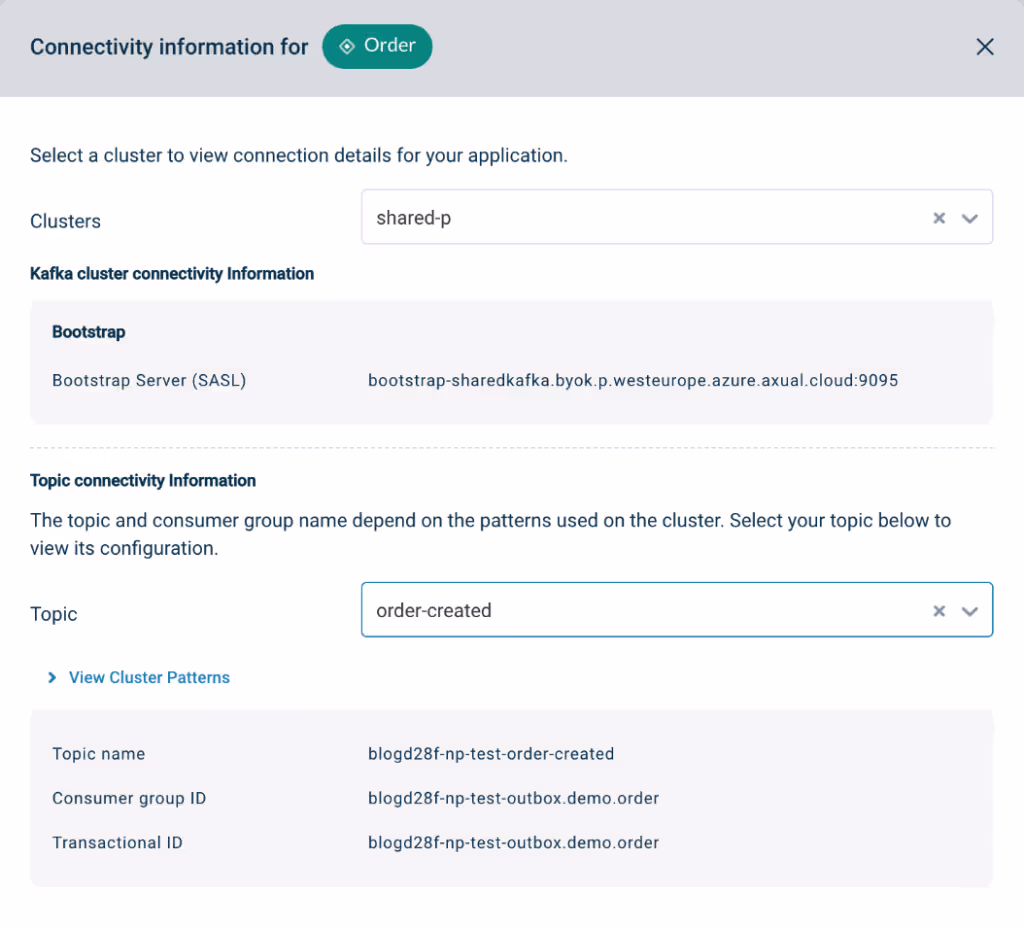
Note the actual topic name is blogd28f-np-test-order-created. Below is the Kafka configuration in application-axual.yaml. Remember to replace the <username> and <password> with the credentials obtained from Axual earlier. Also replace the <TOPIC-NAME> with the topic name and for the Notification service, the <GROUP-ID> with the Consumer Group ID shown in the Connectivity information above.
spring:
  kafka:
    bootstrap-servers: bootstrap-sharedkafka.byok.p.westeurope.azure.axual.cloud:9095
    producer:
      properties:
        sasl:
          mechanism: SCRAM-SHA-512
          jaas:
            config: org.apache.kafka.common.security.scram.ScramLoginModule required username="<username>" password="<password>";
        spring.json.add.type.headers: "false"
    properties:
      security:
        protocol: SASL_SSL

notification:
  order-created-kafka-topic: "<TOPIC-NAME>"
  group-id: "<GROUP-ID>"
Now we are ready to run the application. Go inside the “order” folder and run the command:
mvn spring-boot:run -Dspring-boot.run.profiles=axual
This will start the Orders service with Spring profile “axual” active. Once the application starts, call the REST endpoint /orders to trigger order creation.
curl -X POST http://localhost:8080/orders -d "product=Coffee"
Below are some of the relevant logs:
[           main] .e.k.KafkaEventExternalizerConfiguration : Registering domain event externalization to Kafka…

Hibernate: insert into orders (product,status,id) values (?,?,default)
[nio-8080-exec-1] .s.m.e.c.DefaultEventPublicationRegistry : Registering publication of example.order.OrderCreated for example.shipping.Shipping.on(example.order.OrderCreated).
[nio-8080-exec-1] .s.m.e.c.DefaultEventPublicationRegistry : Registering publication of example.order.OrderCreated for org.springframework.modulith.events.support.DelegatingEventExternalizer.externalize(java.lang.Object).
[nio-8080-exec-1] example.order.OrderManagement            : Order created
Hibernate: insert into event_publication (completion_date,event_type,listener_id,publication_date,serialized_event,id) values (?,?,?,?,?,?)
Hibernate: insert into event_publication (completion_date,event_type,listener_id,publication_date,serialized_event,id) values (?,?,?,?,?,?)

[         task-1] example.shipping.Shipping                : Started shipping for order 1
[         task-1] .s.m.e.c.DefaultEventPublicationRegistry : Marking publication of event example.order.OrderCreated to listener example.shipping.Shipping.on(example.order.OrderCreated) completed.

[         task-2] .s.m.e.c.DefaultEventPublicationRegistry : Marking publication of event example.order.OrderCreated to listener org.springframework.modulith.events.support.DelegatingEventExternalizer.externalize(java.lang.Object) completed.
Hibernate: update event_publication set completion_date=? where serialized_event=? and listener_id=?
To verify the message is produced to Kafka, go to the order-created topic page in Axual UI and switch to Messages tab. Click on Search to find the message.
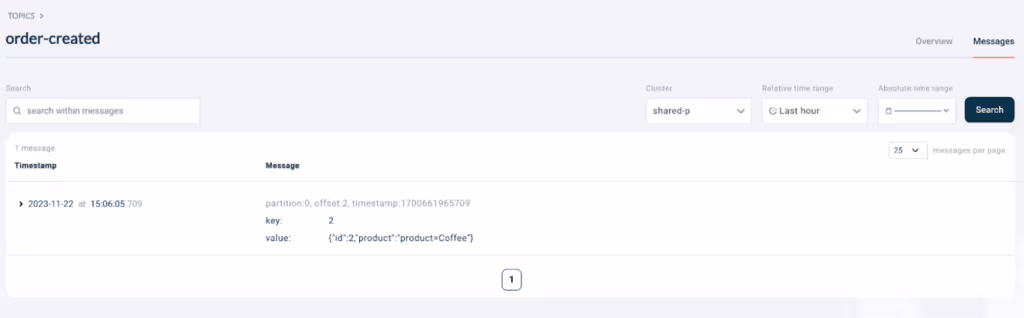
We have successfully implemented the Outbox pattern by persisting the state of the entity and publishing an event to Kafka in a consistent manner.
While testing the Spring Modulith library for this blog, I found a bug which allows the event publication to be marked completed even when the message is not successfully produced to Kafka for any reason (e.g. broker is down). Many thanks to Oliver Drotbohm, the lead of Spring Modulith project, who quickly resolved the issue. The fix will be available in the upcoming 1.1.1 release. The details of the bug can be found here: https://github.com/spring-projects/spring-modulith/issues/395.
The reference code uses the 1.2.0-SNAPSHOT version which includes the fix.
Implementing the Notification Service
The Notification service will listen for events in the Kafka topic order-created. This can be implemented with a standard Spring Kafka consumer.
@Slf4j
@SpringBootApplication
public class NotificationApplication {

    public static void main(String[] args) {
        SpringApplication.run(NotificationApplication.class);
    }

    @KafkaListener(topics = "order-created", groupId = "notification")
    public void notify(OrderCreated event) {
        log.info("Notifying user for created order {} and product {}", event.id(), event.product());
    }
}
Run the same command under the “notification” folder to start the Notification service. It should immediately consume the message from Kafka and log a line: “Notifying user for created order 1 and product “Coffee”.
Visualizing the flow with Distributed Tracing
Distributed Tracing is an excellent way to gain insights into the behavior of systems especially in production environments. With the help of OpenTelemetry Java agent, we can quickly generate traces and send it to a OpenTelemetry compatible backend. Here’s a view of the entire flow in Honeycomb.
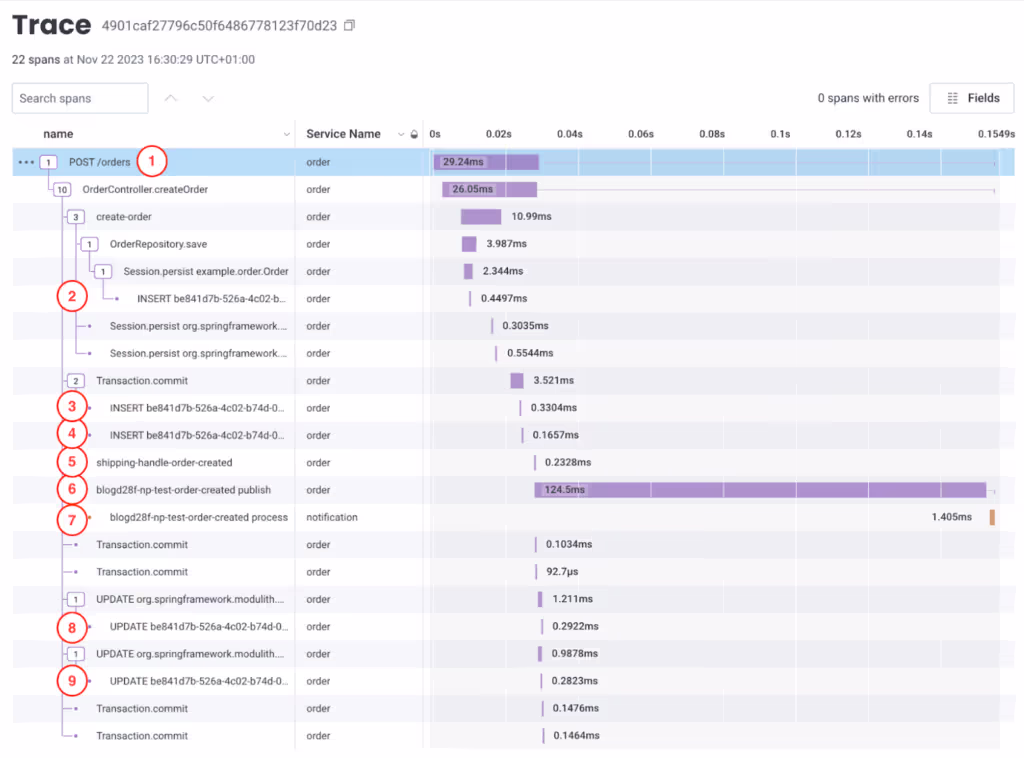
- REST call to
/ordersendpoint to create an order. - Order is persisted in the database.
- Entry added in event publication registry for Shipping event listener.
- Entry added in event publication registry for OrderCreated event externalization.
- Shipping event listener processes the OrderCreated event.
- OrderCreated event is published to Kafka topic.
- Notification service consumes the OrderCreated event from the Kafka topic.
- Entry for Shipping event listener (3) marked completed in publication registry.
- Entry for OrderCreated Event externalization (4) marked completed in publication registry.
What about Ordering?
Are the events published to Kafka in the same order as they are generated in the application? In error scenarios, it is possible to have Spring Modulith publish a previously incomplete event while events that came later are already published. Hence ordering is not guaranteed. If ordering is important for the use case, then CDC with Debezium is the best option as it guarantees ordering.
Spring Modulith Useful Features
In addition to enabling the outbox pattern with Event externalization, Spring Modulith has other core features that can be useful for many Spring Boot applications.
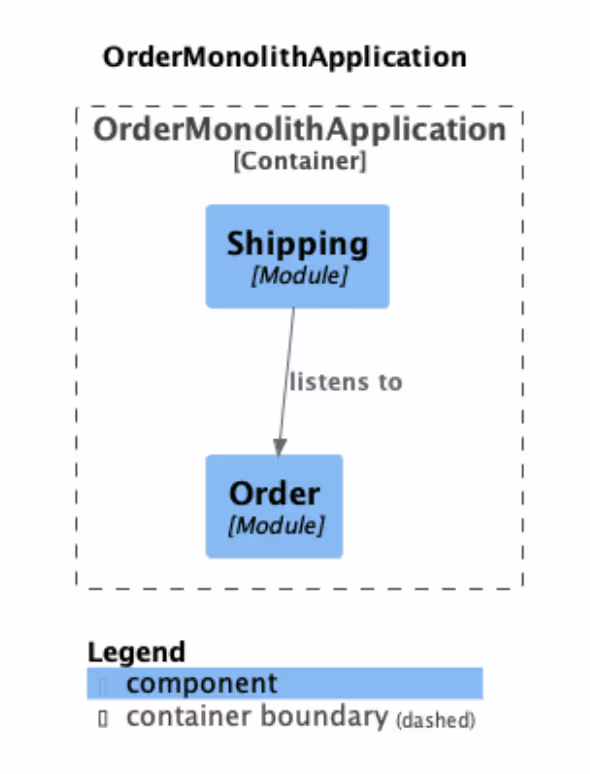
Documenting Application Modules with Spring Modulith
Adding a simple test below will generate a C4 component diagram containing all modules within the application.
Include below dependency in pom.xml
<dependency>
    <groupId>org.springframework.modulith</groupId>
    <artifactId>spring-modulith-starter-test</artifactId>
    <scope>test</scope>
</dependency>class DocumentationTest {

    @Test
    void createModulithsDocumentation() {

        new Documenter(ApplicationModules.of(OrderMonolithApplication.class))
                .writeDocumentation();
    }
}
Here is the C4 diagram of our Order monolith application.
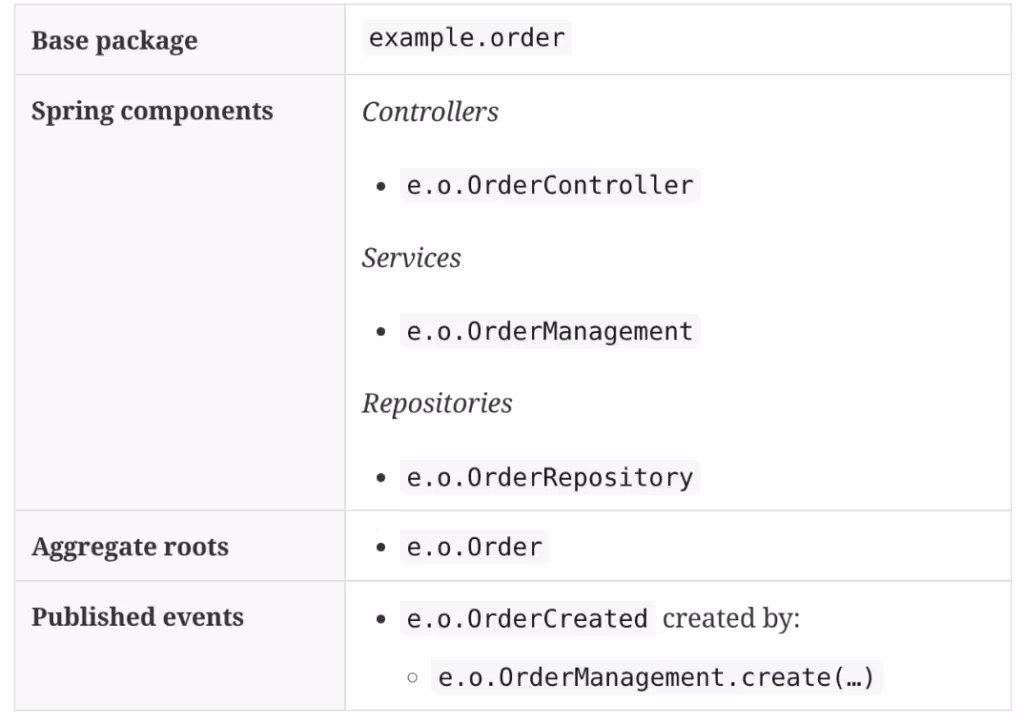
It also generates module canvases in AsciiDoc format highlighting the important parts of each module. Here’s the canvas for the Order module.
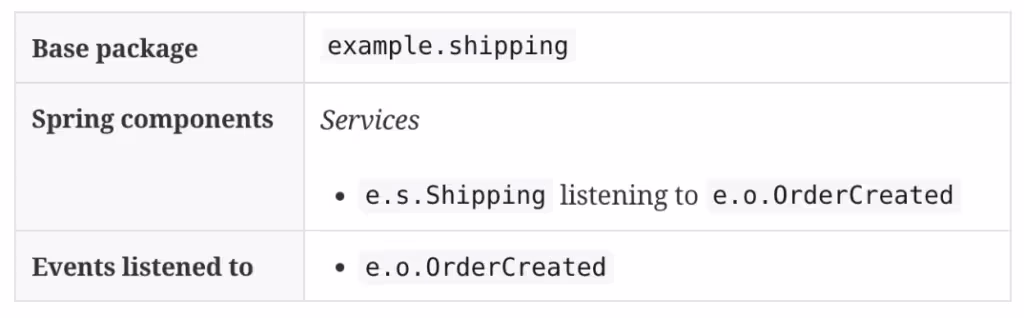
The canvas for Shipping module:
Read more about Application modules documentation here: https://docs.spring.io/spring-modulith/docs/current/reference/html/#documentation.
Integration Testing Application Modules
One of the advantages of loosely coupled modules is the ease of testing each module without mocking dependent modules. Spring Modulith provides an annotation @ApplicationModuleTest to facilitate independent testing of modules. It is a shortcut for @SpringBootTest but limits the component scanning to the module under test.
In the test below, we use the Scenario API to simulate the creation of an order and verify an event of type OrderCreated is generated with correct data.
@Slf4j
@ApplicationModuleTest
class OrderModuleTests {

    @MockBean
    KafkaOperations<?, ?> kafkaOperations;

    @Autowired
    OrderManagement orders;

    @Test
    void shouldTriggerOrderCreatedEvent(Scenario scenario) {

        when(kafkaOperations.send(any(), any(), any())).then(invocation -> {
            log.info("Sending message key {}, value {} to {}.", invocation.getArguments()[1], invocation.getArguments()[2], invocation.getArguments()[0]);
            return CompletableFuture.completedFuture(new SendResult<>(null, null));
        });

        scenario.stimulate(() -> orders.create("Coffee"))
                .andWaitForEventOfType(OrderCreated.class)
                .toArriveAndVerify(event -> assertThat(event.product()).isEqualTo("Coffee"));
    }
}
Read more about Application module testing here: https://docs.spring.io/spring-modulith/docs/current/reference/html/#testing.
Additional FAQ regarding Implementing Outbox Pattern for Kafka
The Outbox Pattern handles transaction rollbacks by ensuring that any changes made within the transaction, including the insertion of the event into the outbox table, are rolled back together. This means if the transaction that includes the business logic (e.g., saving an order in the database) is rolled back for any reason, the corresponding entry in the outbox table is also rolled back. This ensures that no events are published for transactions that did not complete successfully. The asynchronous process that monitors the outbox table for new events to publish will only see and process events that are part of successfully committed transactions, thereby preventing the publication of events related to rolled-back transactions.
To manage duplicate events, several strategies can be employed. One common approach is to design event consumers to be idempotent, meaning that processing the same event multiple times does not result in incorrect system states or repeated side effects. This can be achieved by tracking event identifiers in the consumer and ensuring that each event is processed only once. Another strategy involves using a unique constraint in the data model that naturally prevents duplicates, such as upsert operations based on unique keys. Additionally, some messaging systems provide built-in support for deduplication based on message identifiers or other properties, which can be leveraged to prevent processing duplicates.
The Outbox Pattern can indeed be extended to support multiple event stores or messaging systems. This typically involves configuring multiple asynchronous processes or listeners, each responsible for monitoring the outbox table and publishing events to a different system. The implementation would need to ensure that each event is published to the appropriate system based on the event’s metadata or other criteria. This might involve extending the outbox table schema to include a column specifying the target system for each event or implementing logic within the asynchronous process to determine the correct target based on the event type or content. Care must be taken to manage the complexity that comes with supporting multiple systems, including handling failures and ensuring consistency across different systems.
Conclusion
In this blog, we looked at Implementing Outbox Pattern and the problem of “dual-write” and especially into how Spring Modulith can be used to implement the Outbox pattern in an easy way to solve the problem.
We also looked at how Axual provides an out-of-the-box secure, production-ready Kafka cluster with built-in Governance to ensure that your organization’s journey into Event Driven architecture is safe and scalable. If you would like to learn more about Axual and talk to one of our Kafka experts, please visit https://axual.com/contact-us/.
All code referred to in this blog is available here: https://gitlab.com/axual/public/outbox-pattern-with-spring-modulith. The repository contains a docker-compose file to quickly spin up the services, Kafka cluster and Zipkin for distributed tracing locally. Check the README for more details. We hope you enjoyed this blog about Implementing Outbox Pattern. Want to know more? Get in contact and we will answers all your questions.

Answers to your questions about Axual’s All-in-one Kafka Platform
Are you curious about our All-in-one Kafka platform? Dive into our FAQs
for all the details you need, and find the answers to your burning questions.
Spring Modulith facilitates the Outbox Pattern implementation by enabling a modular architecture, which allows for clear separation of concerns and organized code within a monolithic application. It integrates with Spring's built-in event system, utilizing ApplicationEventPublisher for local event publishing instead of relying on external messaging systems. This allows modules to communicate asynchronously while keeping event handling straightforward and efficient. Overall, Spring Modulith streamlines the process of managing events and database interactions, making it easier to ensure consistency and reliability in the application.
Traditional dual-write approaches face challenges with consistency, where either the event is published without the corresponding database update or vice versa. In the Outbox Pattern, both actions occur within the same transaction, eliminating the risk of inconsistency. For example, when an order is created, both the order details and an intent to publish an event are saved together in a single transaction. If the transaction commits successfully, a background process then handles event publishing. This design ensures that if the event fails to publish, the state remains consistent in the database, providing a reliable solution to the dual-write problem.
The Outbox Pattern is a design approach used in systems with multiple components that require consistent updates across different systems, such as a database and a message broker (e.g., Kafka). It addresses the dual-write problem, where the risk of inconsistency arises when an event is published to one system while the corresponding data update in another system fails. By using the Outbox Pattern, events are first stored in a dedicated "outbox" table in the same database transaction as the data update. A separate process then reads from the outbox table to publish the events, ensuring that both operations are consistent and that the system is eventually consistent.
Related blogs

Axual 2026.2, the Summer LTS release, brings continuous message fetching and CEL-based queries to Topic Browse, Externalised Groups for managing membership through your Identity Provider, the move to Apicurio v3, improved Audit Events, KSML 1.3, and new MCP Server capabilities.
A technical overview of the Strimzi 1.0.0 CRD migration path, including CRD versioning, conversion tooling, storage updates, and operational considerations for ArgoCD-managed GitOps Kubernetes environments.
.png)
This blog explores why many European organizations and policymakers remain skeptical of AWS’s “sovereign” cloud initiative. From concerns around US jurisdiction and the CLOUD Act to questions about operational independence, data governance, and true digital sovereignty, we break down the key reasons behind Europe’s hesitation. The article also examines the broader push for European cloud alternatives and what this means for enterprises navigating compliance, security, and infrastructure strategy.